Click  (the Create stack block tool.)
Click the bottom left corner of the small rectangle. A dialog appears to add a new or existing stack block.
Click New. The Add Stack Block form appears.
On the General tab:
Follow these instructions to set up blocks for your placeholder yard. You must have completed the previous steps in sequence.
Before you begin:
Set up a basic N4 Topology
Create a placeholder yard model (on page 1)
Add Bin Name Tables and Bin Names to the placeholder yard model (on page 1)
Create and upload the placeholder image map (replacement topic) (on page 1)
Set Reference Points (on page 1)
Draw the yard perimeter (on page 1)
Optional: Review the Add or edit a stack block (on page 1) and child topics. These topics provide details about the fields, descriptions, and valid codes and ranges for the General, Display, Names, and Specs tabs that you will complete in steps 5-8 below.
To add a stack block:
Zoom in on the small rectangle inside the perimeter with the magnifying tool. Make sure the all four corners of the small rectangle appear in the Yard Editor.
Click (the Create stack block tool.)
Click the bottom left corner of the small rectangle. A dialog appears to add a new or existing stack block.
Click New. The Add Stack Block form appears.
On the General tab:
For the Name, enter up to six characters for a name. For this example, we will use 'PBLOCK' for to stand for placeholder block.
For the Block Type, enter 'Forklift or top picks'.
For Code Chars, enter 'F', for Forklift.
Leave RTG Lane empty.
On the Display tab:
Check the Compress Scan box.
Leave the Direction as 'Unknown'.
Check the Sort by Logical Coords box.
Leave Rotate 90, Invert Scan X, and Invert Scan Y unchecked.
Leave Stack Length in Pixels as 20.
Leave Stack Width in Pixels as 9.
Leave Pixels Between as 0.
On the Names tab:
For Label Format Row Only, enter 'R1'.
For Label Format Column Only, enter 'C1'.
For Label Format Tier Only, enter 'T1'.
For User Label Format, N4 allows you to enter up to seven characters.
For Internal Label Format, N4 allows you to enter up to seven characters.
For Row Table 20, select 'ROW20'.
For Row Table 40, select 'ROW40'.
For Tier Table, select 'TIER'.
Leave 40' Extends Ascending unchecked.
On the Specs tab:
Leave Invert Rows and Invert Columns unchecked.
For Default Row Width (cm), leave the default value of '610 cm'.
For Default Space Between Rows (cm), leave the default value of '0 cm'.
For Default Column Width (cm), leave the default value of '244 cm'.
For Default Space Between Columns (cm), leave the default value of '0 cm'.
For First Tier, enter '1'.
For Last Tier, enter '3'.
Click Save, and Close. The Add Stock Block form closes, and N4 places the PBLOCK onto the small rectangle in the map.

Add sections and columns to the stack block:
Right-click the stack block you just created. A menu appears.
Select Add Yard Sections. The Add Yard Sections form opens.
For First Row, enter 1
For Last Row, enter 4
For First Column, enter 1
For Last Column, enter 5
Leave the other fields in their default states.
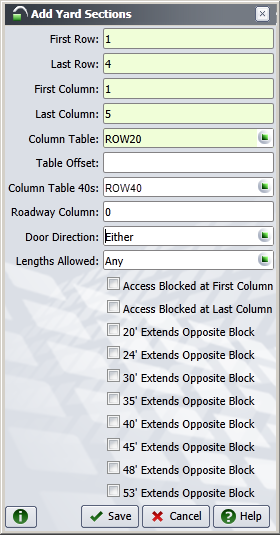
Click Save. The form closes, and the block now has four rows and five columns (or 'stacks').
The placeholder yard is now ready to be applied and made active.
Next step(s):
Apply Placeholder Yard Model to Active Yard (for IG) (SHARED) (on page 1)